Windows 10 Repair: A Comprehensive Guide To Command Prompt Troubleshooting
Windows 10 Repair: A Comprehensive Guide to Command Prompt Troubleshooting
Related Articles: Windows 10 Repair: A Comprehensive Guide to Command Prompt Troubleshooting
Introduction
With enthusiasm, let’s navigate through the intriguing topic related to Windows 10 Repair: A Comprehensive Guide to Command Prompt Troubleshooting. Let’s weave interesting information and offer fresh perspectives to the readers.
Table of Content
- 1 Related Articles: Windows 10 Repair: A Comprehensive Guide to Command Prompt Troubleshooting
- 2 Introduction
- 3 Windows 10 Repair: A Comprehensive Guide to Command Prompt Troubleshooting
- 3.1 Understanding the Command Prompt’s Role in Repair
- 3.2 Navigating the Command Prompt for Repair
- 3.2.1 1. System File Checker (SFC)
- 3.2.2 2. Deployment Image Servicing and Management (DISM)
- 3.2.3 3. Boot Configuration Data (BCD) Repair
- 3.2.4 4. Registry Repair
- 3.2.5 5. Disk Management and Repair
- 3.3 FAQs Regarding Windows 10 Repair using the Command Prompt
- 3.4 Tips for Using the Command Prompt for Windows 10 Repair
- 3.5 Conclusion: Empowering Users Through Command Prompt Repair
- 4 Closure
Windows 10 Repair: A Comprehensive Guide to Command Prompt Troubleshooting
Windows 10, despite its robust design, is not immune to system errors. These errors can range from minor inconveniences like slow performance to critical issues that prevent the operating system from booting. In such scenarios, the Command Prompt, a powerful tool within Windows, offers a potent avenue for system repair and recovery.
This article will delve into the multifaceted world of Windows 10 repair using the Command Prompt, outlining its significance, functionality, and practical applications.
Understanding the Command Prompt’s Role in Repair
The Command Prompt, also known as the Command Line Interface (CLI), provides a text-based method of interacting with the operating system. Unlike the graphical user interface (GUI), which relies on visual elements like icons and menus, the Command Prompt uses text commands to execute specific actions. This text-based approach offers a direct and powerful way to access and modify system files, troubleshoot issues, and execute advanced operations.
When it comes to Windows 10 repair, the Command Prompt acts as a versatile tool, enabling users to:
- Diagnose and Resolve System Errors: The Command Prompt provides access to a range of diagnostic tools and commands that can pinpoint the root cause of system errors. These tools can identify corrupted files, registry issues, and other system inconsistencies.
- Repair Corrupted System Files: System files are crucial for the smooth operation of Windows 10. The Command Prompt facilitates the use of tools like the System File Checker (SFC) and DISM (Deployment Image Servicing and Management) to scan and repair corrupted system files.
- Modify System Settings: The Command Prompt offers a granular level of control over system settings, allowing users to adjust boot options, network configurations, and other critical parameters.
- Execute System Recovery Operations: In cases where the operating system is significantly compromised, the Command Prompt can be used to initiate system recovery operations, such as restoring a previous system image or reinstalling Windows.
Navigating the Command Prompt for Repair
While the Command Prompt provides extensive repair capabilities, it requires familiarity with its syntax and commands. The following sections provide a detailed overview of key commands and their applications in Windows 10 repair:
1. System File Checker (SFC)
The SFC tool is a built-in Windows utility that scans and repairs corrupted system files. It checks the integrity of protected system files and attempts to replace any corrupted files with cached copies.
Command: sfc /scannow
Usage:
- Open the Command Prompt as administrator.
- Type
sfc /scannowand press Enter. - The scan process will take some time to complete.
- Upon completion, a message will display the results, indicating if any corrupted files were repaired.
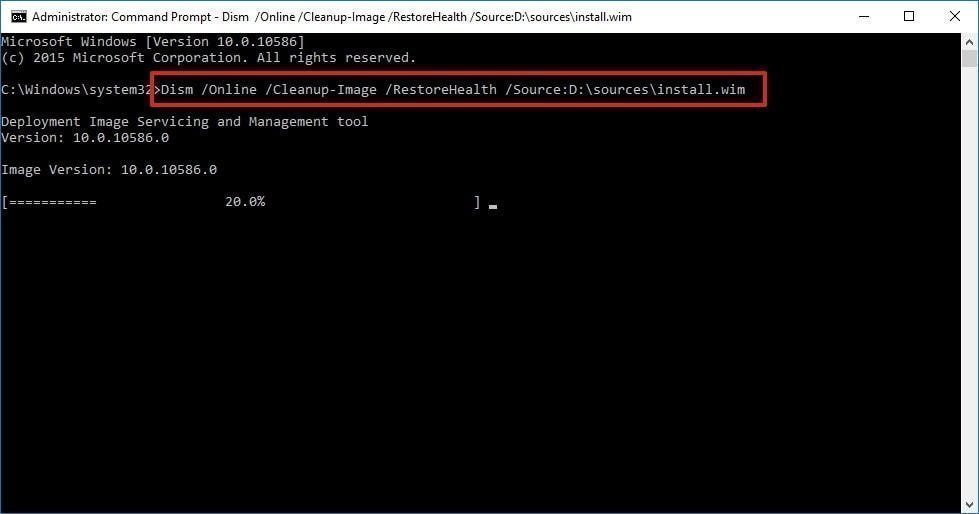
2. Deployment Image Servicing and Management (DISM)
DISM is another powerful tool that can repair corrupted system files. It works by scanning the system image for issues and attempting to restore corrupted files from a Windows installation source.
Commands:
-
Scanning and Repairing the System Image:
DISM /Online /Cleanup-Image /RestoreHealth -
Using a Windows Installation Source:
DISM /Online /Cleanup-Image /RestoreHealth /Source:C:RepairSourceWindows(ReplaceC:RepairSourceWindowswith the path to your Windows installation source)
Usage:
- Open the Command Prompt as administrator.
- Execute the appropriate command based on your situation.
- The scan and repair process may take some time.
- Upon completion, a message will indicate the results.
3. Boot Configuration Data (BCD) Repair
The BCD stores critical boot information, including the location of the operating system and its boot options. Corruptions in the BCD can prevent Windows from booting properly. The bootrec command offers a suite of tools for repairing BCD issues.
Commands:
-
Repairing the Boot Sector:
bootrec /fixboot -
Rebuilding the BCD:
bootrec /rebuildbcd -
Scanning for Missing Operating Systems:
bootrec /scanos -
Repairing the Boot Configuration Data:
bootrec /fixmbr
Usage:
- Boot into the Windows Recovery Environment (WinRE) using a bootable USB drive or system repair disc.
- Open the Command Prompt.
- Execute the relevant
bootreccommand based on the specific boot issue.
4. Registry Repair
The Windows Registry is a hierarchical database that stores system settings and configuration information. Corruptions in the registry can lead to various system errors. While the Command Prompt doesn’t directly offer registry repair tools, it can be used to access and modify registry entries.
Commands:
-
Exporting the Registry:
reg export "HKEY_LOCAL_MACHINESYSTEM" C:RegistryBackup.reg(This command exports the SYSTEM registry hive to a file namedRegistryBackup.reg) -
Importing the Registry:
reg import C:RegistryBackup.reg(This command imports the exported registry file back into the system)
Usage:
- Use the
regcommand with caution as incorrect modifications can cause significant system damage. - Create a backup of the registry before making any changes.
- Use the appropriate commands to export, import, or modify registry entries as needed.
5. Disk Management and Repair
The Command Prompt provides access to disk management tools, enabling users to repair disk errors, manage partitions, and format drives.
Commands:
-
Checking Disk Errors:
chkdsk /f /r C:(ReplaceC:with the drive letter of the disk to be checked) -
Creating a Partition:
diskpart(Opens the DiskPart utility. Use commands likecreate partition primaryandformat fs=ntfs quickto create and format a partition)
Usage:
- Open the Command Prompt as administrator.
- Execute the relevant commands based on your disk management needs.
FAQs Regarding Windows 10 Repair using the Command Prompt
Q: What are the benefits of using the Command Prompt for Windows 10 repair?
A: The Command Prompt offers a powerful and flexible approach to system repair, providing direct access to system files, advanced troubleshooting tools, and granular control over system settings. It enables users to address a wide range of system issues that may not be easily resolved through the graphical user interface.
Q: How do I access the Command Prompt in the Windows Recovery Environment (WinRE)?
A: To access the Command Prompt in WinRE, you need to boot into the recovery environment using a bootable USB drive or system repair disc. During the boot process, select "Troubleshoot" and then "Advanced options." From there, choose "Command Prompt."
Q: Can I use the Command Prompt to restore my system to a previous state?
A: While the Command Prompt doesn’t directly offer system restore functionality, it can be used to execute commands that initiate system recovery operations. For example, you can use the DISM command to restore the system image from a previous backup.
Q: What if I am unsure about the commands to use for repair?
A: If you are unfamiliar with the Command Prompt or its commands, it is highly recommended to consult official Microsoft documentation or seek assistance from a qualified technician. Incorrect commands can cause further damage to your system.
Tips for Using the Command Prompt for Windows 10 Repair
- Always Back Up Your Data: Before attempting any repair operations, ensure you have a recent backup of your important data. This will prevent data loss in case of unforeseen errors.
- Use Caution with Commands: The Command Prompt is a powerful tool, and incorrect commands can lead to data loss or system instability. Consult official documentation or seek expert guidance before executing any commands.
- Restart Your Computer After Repair: After performing repair operations, it is essential to restart your computer to allow the changes to take effect.
- Keep Your System Updated: Regularly updating Windows and your drivers can help prevent system errors and ensure optimal performance.
Conclusion: Empowering Users Through Command Prompt Repair
The Command Prompt, though often perceived as a technical tool for advanced users, offers a powerful and versatile method for repairing Windows 10 issues. By understanding its capabilities and utilizing its commands appropriately, users can effectively troubleshoot and resolve a wide range of system problems, restoring their operating system to a healthy and functional state.
While the Command Prompt requires a degree of technical knowledge and caution, it empowers users to take control of their system’s health and maintain its optimal performance. By harnessing the power of the Command Prompt, users can become more self-reliant in addressing system issues and ensuring a smooth and efficient computing experience.
![How to Repair Windows 10 Using Command Prompt [3 Ways] - EaseUS](https://www.easeus.com/images/en/data-recovery/drw-pro/repair-windows10-with-cmd.png)


Closure
Thus, we hope this article has provided valuable insights into Windows 10 Repair: A Comprehensive Guide to Command Prompt Troubleshooting. We thank you for taking the time to read this article. See you in our next article!